Setup Printing For Windows
Learn how to setup and configure order printing for Windows devices with our printing software
Our system allows you to manually and automatically print out new orders. This guide will show you how to set order printing and troubleshoot issues.
|| We are happy to remotely set up your printer for you. We know this is a step that can trip up many people due to every printer being a bit different. Please get in touch with us if you need assistance
For step by step instructions by printing method. Please use the following instructions. It is worth noting that for most situations, we recommend using the Windows Shared Printing method;
Printing - API KeyRequirements
Windows 7 / 8 / 10 either 32-bit or 64-bit
A Windows-compatible printer with the drivers installed
Latest version of PushPrinter that can be downloaded here
Setup Process
Verify Printer Drivers Are Installed & Working
If your drivers are successfully installed, your printer will be shown on your PC under "Control Panel > Hardware and Sound > Devices and Printers"
Right-click your printer and select "Properties"
On the bottom left, press "Print Test Page".
Verify that the test page successfully printed
If this is successful, your printer will work fine. If you cannot find your printer or it doesn't work, reinstall the driver again.
Take Note Of The Paper Sizes Available
This step is slightly different for all printers. Some printers provide their own configuration tool where you can view the paper sizes available.
By default, you might find this information under your printer "Properties" dialogue as described in the previous step. Sometimes this is found under the "Device Settings" tab in your printer properties.
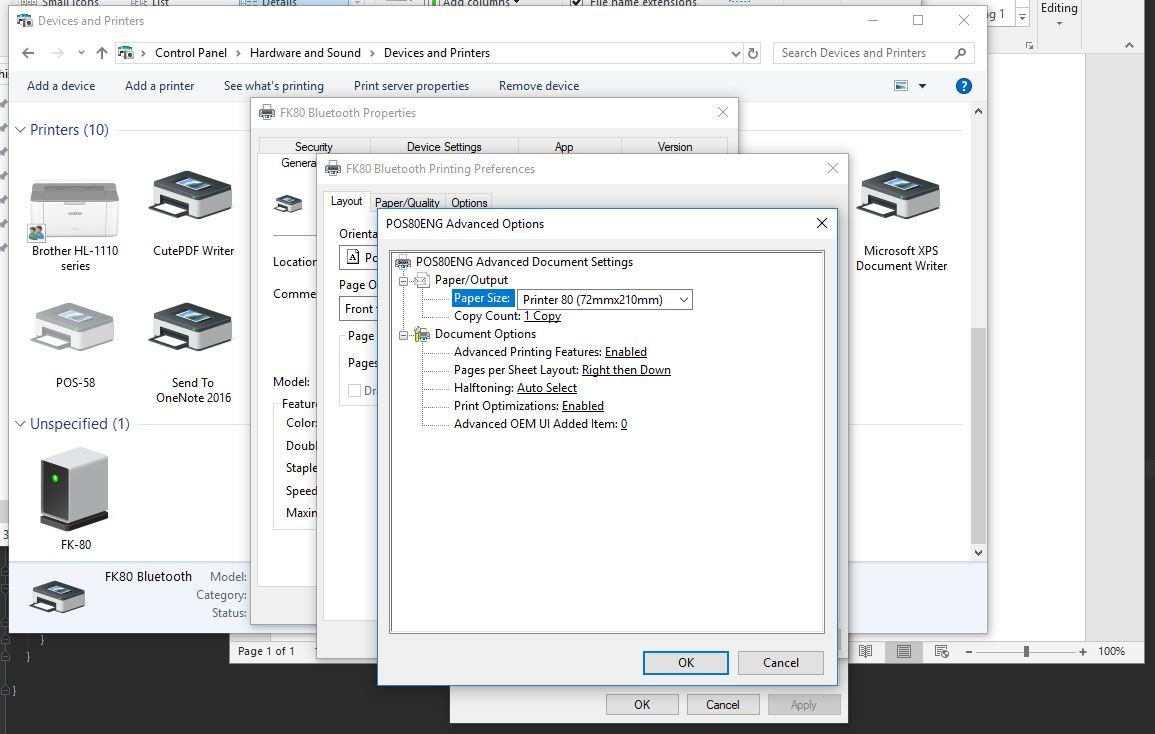
Other times you may select "Preferences" at the bottom of the printer properties popup and then select "Advanced" at the bottom again
Refer to the image below to see what this may look like.

Take note of the paper sizes available as you will likely need to try a few to get it working flawlessly
Create A Printer Configuration
Visit your restaurant dashboard and navigate to "Settings > Receipt Printing"
Press the "New Printer" button and fill out any options needed
On the "Paper Settings" tab, set your paper width and paper height according to the largest available paper size available for your printer as noted in the previous step. Going off the image above, we would enter a width of "72" and a height of "210"
We highly recommend starting with a font size of "18" and a paper margin of "0"
Create the print configuration. After creating it, you will get a unique API key to connect to it. Keep this screen open as you will need to copy your API key soon

|| The paper sizes entered in your printer configuration must match your Windows paper size settings as set in the printer driver options. If the printout is incorrect or skewed, you will need to test out the other sizes from largest to smallest. When changing the sizes in the printer configuration make sure to change it in the Windows printer driver settings.
Install PushPrinter
Download PushPrinter from the following link
Run the installer, you will get a warning that the application is unverified, proceed with the installation
After it is installed successfully, PushPrinter will automatically open
Configure PushPrinter
The first thing you will likely want to do is toggle the "Auto Start" switch so it connects and starts when your PC is started. Activate this by selecting the "Settings Cog" and ticking the 'Automatically start PushPrinter' button (image 1.1).
Press on the "Printer Icon" tab at the top to configure a printing service
Press "Create Printer" button (image 1.2).
Copy and paste the API key for the printer you created 2 steps ago
Set the number of copies to print and select your printer
Press the start button and make sure it says connected at the bottom


Test Print
Visit your orders page. Select an order, under the action select bar, select print. We recommend printing both short and long orders to ensure that there is nothing being cut out vertically. If you have enabled auto-printing for this print configuration, place an order and test out the auto printing
Troubleshooting
Contact Us
We have successfully setup 100's of printers, there is a good chance we can save you lots of headaches so please don't hesitate to contact us.
Sides being cut-off
Start by reducing either your margin or paper width values under your printer configuration in your admin dashboard. You will eventually calibrate a suitable width and margin. You can also adjust the font size to something smaller. You can get your correct paper width under your Windows printer settings as seen in the guide above.
The end of the receipt doesn't come out fully
Under your Windows printer settings. Set your "Feed Line After Printing" option to a high value to allow the printer to feed through a few extra lines.
Invalid API Key
The API key you entered does not below to any of your print configurations. Double check your API key
Could Not Authenticate
Check your internet connection or try again shortly
Printer not being detected in Windows
You need to find the correct driver for your printer provided its available for Windows. Try googling your printer name followed by the words "windows {insert your windows version} driver"
Printing not working even though everything is set up correctly
Please ensure that Windows detects your printer. Try restarting your printer or PC. Try printing to your printer from other programs on your PC such as your browser.
Last updated